
Special Fx: motion Blur
Written by: Edwin Rosero
In this tutorial we will create a blur effect that works great with Text or Images. I recomend using this as roll over movie for a button. You can find a tutorial on how to make an animated Button roll over Here. Before embarking on this tutorial you should have some basic Flash Knowledge. Launch FLASH and PHOTOSHOP and make sure your frame rate is at 30fps. You can edit the movie properties by going to Modify>movie . Lets begin...Step 1.
-We will being this tutorial in Photoshop. Start
a new image and make it no more than
334x150 in dimension size. Now, Using the Text tool
Type in the text you plan to use in your flash movie(be sure to remember the
Font
and font size you are using). In this case we will use the words "motion
blur" and a font size of 20. Merge
the text layer with the backroundlayer by selecting the text layer and pressing
CTRL+E.
Step 2.
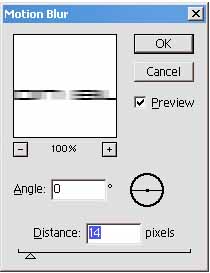
-Now that you have your text ready its time to
blur it. Go to Filters>blur and select motion
blur. Bluring the text by 14 pixels for a medium sized blur. If you want to
give the illusion that your
text is moving at even higher speeds, simply adjust the settings to Blur the
text by 24 0r 34 pixels.
Now that you have the desired blur save the image. ( set the Quality setting
between 2-4)
Step 3.

-Switch to Flash. Type in the same word we used
using the same Font and Font Size as before.
Make the text into a symbol by pressing F8. You can make the text a button or
movie clip depending
on what you need. For this demonstration we will make it into a graphic. Next,
import the blured image
convert it into a graphic symbol and place it in its own layer. Name the new
layer "imported text". and
Name the Layer that contains our Flash text "Flash text".
Step 4.

- Line up the Blured image so that its lined up
with our Flash text. In the "Flash Text" layer, make a key frame on
frame 4.
move the flash text graphic to the left. Now, select the "Imported text"
layer and do the same.
On frame 4 of the "flash text" select our flash text. go to Modify>instance
and set the alpha to 0.
On frame 1 of the " imported text" layer set the Alpha of our imported
image to 0. Now add a blank key frame on frame 5
of the "flash text" layer. Add a keyframe on frame 9 of the "imported
text layer" and move our imported image all the
way to the left so that it is off of the stage.
FINAL.
This is our Finished movie. Experiment and have fun.